
This is a part of the DIY Synthesizer series of posts where each post is roughly built upon the knowledge of the previous posts. If you are lost, check the earlier posts!
This it the third installment of a series of tutorials on how to program your own synthesizer.
In this chapter we’ll continue on from the last chapter, and talk about a way to generate simple wave forms that don’t have aliasing problems. We’ll also talk about sampling, mixing and end with a somewhat realistic song made with samples and our very own platform independent synthesizer code.
You can download the full source code and source wave files from the link below. The code got a bit more complex so there’s a zip file instead of a stand alone main.cpp. Also, it’s not the cleanest, best organized code in the world – sorry about that! – but hopefully it’ll be ok for the purposes of this tutorial (:
DIY Synthesizer: Chapter 3 Source Code
If you don’t want to wait til the end of the chapter to hear the sample song, check it out here:
Aliasing
As mentioned in the previous tutorial, the wave forms we were generating have aliasing problems. Aliasing is an audio artifact where unintended audio frequencies appear in audio data due to trying to encode frequencies that are too high for the sample rate. Wikipedia describes Aliasing pretty well, check it out for more info: Aliasing.
Sound is pressure waves conducted in the air, and at the core, audio engineers and mathematicians like to think of all sound as being made up of sine waves at different frequencies and amplitudes (volumes).
If you have a smooth / bumpy wave form, you could picture building it up with sine waves pretty easily.
If on the other hand, you have something with sharp corners, like a saw wave, a triangle wave or a square wave, it gets more difficult.
In fact, to make a “perfect corner” out of sine waves, it would take an infinite amount of sine waves of ever diminishing frequency and amplitude to get the perfectly sharp corner.
In chapter one I briefly mentioned that the maximum frequency you can store in audio data is half the sample rate. This frequency is called the Nyquist frequency and you can read more about it here: Nyquist Frequency and here: Nyquist-Shannon sampling theorem.
Aliasing occurs whenever you try to store a frequency higher than the nyquist frequency. When you do that, your audio data is not what it ought to be (a higher frequency actually appears to be a lower frequency), causing audio artifacts. If you’ve ever seen a car’s wheels spinning too slowly or backwards in a tv commercial, that is the exact same problem.
So, when making a “perfect corner” on a saw, triangle, or square wave, and having to use infinitely high frequencies to make that corner, you can bet that an infinite frequency is above Nyquist, and that it will cause some aliasing.
So, to make band limited wave forms for saw, square, and triangle, we just add together the sine waves UP TO nyquist, and then stop, instead of continuing on to infinity (which would also take far too long to calculate hehe). That makes a much cleaner, smoother sound, that is a lot easier on the ears.
A friend of mine who wishes to remain nameless has been a good sport in listening to my audio tracks over the years and for a long, long time she would complain that my songs hurt her ears. I tried putting reverb and flange on my songs to try to mellow them out, and that helped a little, but even then, it still hurt her ears. After I started using band limited wave forms, my songs stopped hurting her ears and my tones started sounding a lot smoother and richer, and more “professional”.
So, if you don’t want people’s ears to bleed when they hear your tunes, I recommend band limited wave forms!
Band Limited Sine Wave
The sine wave does not have a band limited form, since since itself IS bandlimited by definition. So, a band limited sine wave is just the sine wave itself.
Onto the next!
Band Limited Saw Wave
Wikipedia has a great article Sawtooth wave which says:
A sawtooth wave’s sound is harsh and clear and its spectrum contains both even and odd harmonics of the fundamental frequency. Because it contains all the integer harmonics, it is one of the best waveforms to use for synthesizing musical sounds, particularly bowed string instruments like violins and cellos, using subtractive synthesis.
What they mean by that (and what the heavy math formulas on that page say) is that if you have a saw wave of frequency 100, that means it contains a sine wave of frequency 100 (1 * fundamental frequency), another of frequency 200 (2 * fundamental frequency), another of 300 (3 * fundamental frequency) and so on into infinity.
The amplitude (volume) of each sine wave (harmonic) is 1 over the harmonic number. So in our example, the sine wave at frequency 100 has an amplitude of 1 (1/1). The sine wave at frequency 200 has an amplitude of 0.5 (1/2), the sine wave at frequency 300 has an amplitude of 0.333 (1/3) and so on into infinity.
After that you’ll need to multiply your sample by 2 / PI to get back to a normalized amplitude.
There’s a function in the sample code called AdvanceOscilator_Saw_BandLimited() that you can use to generate a band limited saw wave sample. It has an optional parameter where you can tell it how many harmonics to use, but if you omit that parameter, it’ll use as many as it can without going over Nyquist.
Here’s how a band limited saw wave looks and sounds compared to a non band limited saw wave, like the ones we created in the last chapter.

Band Limited Square Wave
Wikipedia has a good article on square wave’s too here: Square Wave which says:
Note that the square wave contains only odd-integer harmonic frequencies (of the form 2π(2k-1)f), in contrast to the sawtooth wave and real-world signals, which contain all integer harmonics.
What this means is that if you were trying to make a square wave at frequency 100, unlike a saw wave which has sine waves at frequencies 100, 200, 300, 400 and so on, a square wave is made up of sine waves of frequencies 100, 300, 500 and 700.
Like the saw wave, however, the amplitude of each frequency is the reciprocal of the multiple of the frequency. So, the sine wave at frequency 100 has an amplitude of 1/1, the sine wave at frequency 300 has an amplitude of 1/3, the sine wave at frequency 500 has an amplitude of 1/5.
After that, you need to multiply by 4/PI to get back to a normalized amplitude.
The function to generate this wave form in the sample code is called AdvanceOscilator_Square_BandLimited().
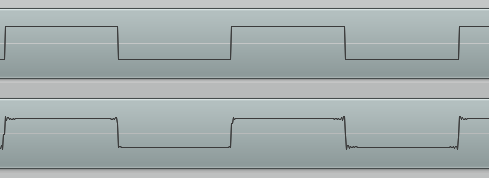
Here’s how a band limited square wave looks and sounds compared to a non band limited square wave, like the ones we created in the last chapter.
Band Limited Triangle Wave
The triangle wave is often used as a cheap approximation of a sine wave so it’s kind of funny making a more expensive (computationally) version of a triangle wave out of sine waves.
The wikipedia article for the triangle wave is here: Triangle Wave and it says:
It is possible to approximate a triangle wave with additive synthesis by adding odd harmonics of the fundamental, multiplying every (4n−1)th harmonic by −1 (or changing its phase by π), and rolling off the harmonics by the inverse square of their relative frequency to the fundamental.
Ok so in English what that means is that a triangle wave is a lot like a square wave, but every other harmonic, we subtract, instead of adding it. Also, instead of the amplitude (volume) of a sine wave being the reciprocal of the multiple of the frequency, the amplitude is the reciprocal of the SQUARE of the multiple of the frequency.
So that means for a 100hz frequency triangle wave, we would…
make a sine wave of 100hz at 1/1 amplitude
Subtract a sine wave of 300hz at 1/9 amplitude
Add a sine wave of 500hz at 1/25 amplitude
Subtract a sine wave of 700hz at 1/49 amplitude
and so on til infinity (or Nyquist frequency)
After that you multiply by 8 / PI*PI to get back to a normalized amplitude.
The function to generate this wave form in the sample code is called AdvanceOscilator_Triangle_BandLimited().
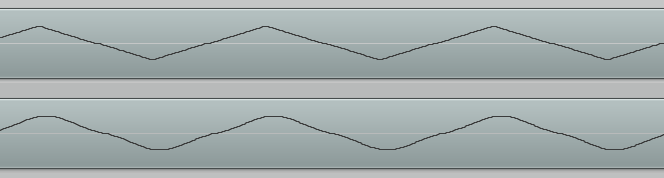
Here’s how a band limited triangle wave looks and sounds compared to a non band limited triangle wave, like the ones we created in the last chapter.
Chapter 3 Triangle Band Limited
Band Limited Noise
In the last chapter we also talked about the “noise” wave form and I briefly mentioned that it had it’s uses – such as in percussion sounds.
Is it possible to make a band limited version? It is, but I’m not sure if it’s really useful for anything, other than a strange sound (but then again, strange sounds is what synth is all about right?)
A quick aside – In this chapter so far, we’ve actually been talking about “Additive Synthesis” which is the process of adding multiple noises together to get an interesting result. Specifically, we’ve been adding sine waves together to get band limited forms of a saw wave, a square wave and a triangle wave. There is something else called “Subtractive Synthesis” where you carve away sounds with filters (such as a low pass filter, a high pass filter, a band pass filter, etc) to get your sound. Another way to generate band limited wave forms is to make a pure, non band limited wave form, and then use a high pass filter to cut out the high frequencies of the sound (the ones generating the aliasing sounds).
In practice, it sounds the same either way you generate it. Subtractive synthesis is just another way to approach the problem of aliasing and synth in general. In fact, when you down sample a sound file (take it from a higher sample rate to a lower sample rate), you should apply a low pass filter first to get rid of any frequencies that would cause aliasing in the lower sample rate.
Anyways, to generate band limited noise, I figured I’d just make a sine wave that changes it’s frequency once every 4000 samples (at a sample rate of 44,100, that means it changes it’s frequency 10 times a second).
Here’s what that looks and sounds like:

Interesting audio, and band limited, but not quite noise, so here is the same thing, switching frequency every 40 samples instead of every 4000 samples. That’s about 1000 times a second .

It is technically noise, and it is band limited, but it sounds weird. Like a tape player on fast forward or water flowing quickly or something.
I didn’t make a function to generate that wave form, but the sample code does it “manually” if you want to make your own function.
Chapter 3 Song
So this chapter has a somewhat passable song as a culmination of the info from the tutorials so far. You can check it out at the bottom of this article, but I wanted to give a quick overview of some other things that went into making it.
The song loads some sound files to use as samples. It loads 3 percussion sounds for the drum parts, and two sound clips from a favorite movie of mine called “Legend” – starring Tim Curry as the devil, Mia Sara as a princess and Tom Cruise as a naturalist wildman who is friends with fairies and elves. It’s a really great movie i really recommend checking it out!
Anyways, it MIXES these sound effects with our generated synth tones by just adding the various sound sources together. Mixing sounds is literally just adding them together.
When it loads up the wave files, it RESAMPLES them if necessary, meaning that if the sound file has a lower sample rate than the sound we want to render, it interpolates samples to make a higher sample rate. If the sound file loaded has a higher sample rate than the sound we want to render, it drops samples to make a lower sample rate. Check out the code for the details of how it does this, but it’s really simple and pretty much works how you’d expect it to. Note that if you down sample audio, you normally want to put it through a low pass filter to cut out any frequencies which would be above Nyquist, but my resampling code doesn’t handle that. It just aliases if there’s a frequency that is too high for the sake of simplicity.
Another thing that happens when it loads each wave file is that it converts it to mono or stereo if needed, to match the format of the sound we want to render. To convert from mono to stereo, it just duplicates the mono channel for the left and right channels, and to convert from stereo to mono, it just mixes (adds!) the left and right channel data together to get the mono channel data. Intuition might tell you that adding the left and right channels together would make it louder, even maybe twice as loud, but in practice that doesn’t happen. Sounds mix together pretty darn well without getting way loud, especially if they are “real life” sounds (not synthesized wave forms) and not played at the exact same time. Basically, the peaks (positive numbers) and valleys (negative numbers) in sound sources tend to cancel each other out and keep things in normal range.
Lastly, when loading a wave file, it normalizes the audio data so that our synth and the audio samples are all working in the same amplitude ranges of -1 to 1. When normalizing, it also “re-centers” the audio data. That is to say, if audio data was really quiet, but was always above the zero axis, it would move the data down to be centered on the zero axis before normalizing to make sure and maximize loudness.
In reality, we’d want to re-center the left and right channels individually, but I just do them together. Also, you might want to normalize individual sections of the audio data at a time instead of normalizing the entire thing as one big chunk at the end. There are a lot of good techniques and algorithms out there to do this, but this functionality is often called a compressor (to give you a place to start your research).
Note, you could easily play sound files backwards to see if they sync up with the wizard of oz, or give you instructions for some tasty brownies, but I didn’t do that in this example code, I leave that up to you!
If you want to be able to read and write other sound formats besides wav files, you might check out libsndfile. I use it in my own projects and it works pretty nicely! You can find it at: libsndfile
The Lament Of Tim Curry
Without further ado, here’s this chapter’s sample song. The full source code and source wave files is in this chapter’s source code zip file. Check it out with headphones for a neat effect, the bass line floats between the left and right channels. Enjoy! And go watch Legend if you haven’t seen it before!
