Gaussian Blur

A web demo implements the formulas from this post at http://demofox.org/gauss.html

There is also this utility which has some real sophisticated features: https://github.com/manuelbua/blur-ninja

In this post we are going to take the concepts we went over in the last post (Box Blur) and apply them to Gaussian blurring.

At a high level, Gaussian blurring works just like box blurring in that there is a weight per pixel and that for each pixel, you apply the weights to that pixel and it’s neighbors to come up with the final value for the blurred pixel.

With true Gaussian blurring however, the function that defines the weights for each pixel technically never reaches zero, but gets smaller and smaller over distance. In theory this makes a Gaussian kernel infinitely large. In practice though, you can choose a cut off point and call it good enough.

The parameters to a Gaussian blur are:

  • Sigma (\sigma) – This defines how much blur there is. A larger number is a higher amount of blur.
  • Radius – The size of the kernel in pixels. The appropriate pixel size can be calculated for a specific sigma, but more information on that lower down.

Just like a box blur, a Gaussian blur is separable which means that you can either apply a 2d convolution kernel, or you can apply a 1d convolution kernel on each axis. Doing a single 2d convolution means more calculations, but you only need one buffer to put the results into. Doing two 1d convolutions (one on each axis), ends up being fewer calculations, but requires two buffers to put the results into (one intermediate buffer to hold the first axis results).

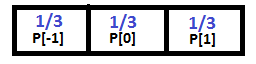
Here is a 3 pixel 1d Gaussian Kernel for a sigma of 1.0:

Below is a 3×3 pixel 2d Gaussian Kernel also with a sigma of 1.0. Note that this can be calculated as an outer product (tensor product) of 1d kernels!

An interesting property of Gaussian blurs is that you can apply multiple smaller blurs and it will come up with the result as if you did a larger Blur. Unfortunately it’s more calculations doing multiple smaller blurs so is not usually worth while.

If you apply multiple blurs, the equivalent blur is the square root of the sum of the squares of the blur. Taking wikipedia’s example, if you applied a blur with radius 6 and a blur with a radius of 8, you’d end up with the equivelant of a radius 10 blur. This is because \sqrt{6^2 + 8^2} = 10.

Calculating The Kernel

There are a couple ways to calculate a Gaussian kernel.

Believe it or not, Pascal’s triangle approaches the Gaussian bell curve as the row number reaches infinity. If you remember, Pascal’s triangle also represents the numbers that each term is calculated by after expanding binomials (x+y)^N. So technically, you could use a row from Pascal’s triangle as a 1d kernel and normalize the result, but it isn’t the most accurate.

A better way is to use the Gaussian function which is this:

e^{-x^2/(2*\sigma^2)}

Where the sigma is your blur amount and x ranges across your values from the negative to the positive. For instance if your kernel was 5 values, it would range from -2 to +2.

An even better way would be to integrate the Gaussian function instead of just taking point samples. You can read about it in the link at the bottom “Gaussian Kernel Calculator”, but it’s also what we do in the example code.

Whatever way you do it, make sure and normalize the result so that the weights add up to 1. This makes sure that your blurring doesn’t make the image get brighter (greater than 1) or dimmer (less than 1).

Calculating The Kernel Size

Given a sigma value, you can calculate the size of the kernel you need by using this formula:

1+2 \sqrt{-2 \sigma^2 \ln 0.005}

That formula makes a Kernel large enough such that it cuts off when the value in the kernel is less than 0.5%. You can adjust the number in there to higher or lower depending on your desires for speed versus quality.

Examples

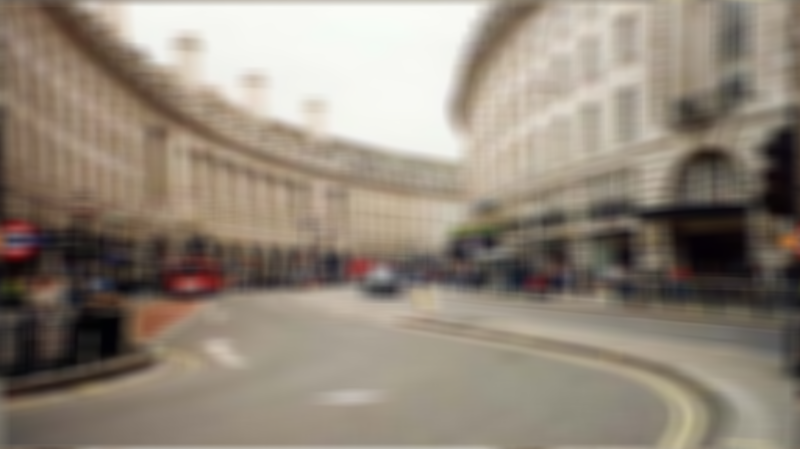
Once again, here is the unaltered image we are working with:

Here is the image blurred with a sigma of 3,3 (3 on the x axis and 3 on the y axis):

Here is the image blurred with a sigma of 20,3:

Here is the image blurred with a sigma of 50,50:

Shadertoy

Here’s a shadertoy implementing Gaussian Blur: Shadertoy:DF Gaussian Blur

Code

Here’s the source code I used to blur the examples above:

#define _CRT_SECURE_NO_WARNINGS

#include <stdio.h>
#include <stdint.h>
#include <array>
#include <vector>
#include <functional>
#include <windows.h>  // for bitmap headers.  Sorry non windows people!

typedef uint8_t uint8;

const float c_pi = 3.14159265359f;

struct SImageData
{
    SImageData()
        : m_width(0)
        , m_height(0)
    { }

    long m_width;
    long m_height;
    long m_pitch;
    std::vector<uint8> m_pixels;
};

void WaitForEnter ()
{
    printf("Press Enter to quit");
    fflush(stdin);
    getchar();
}

bool LoadImage (const char *fileName, SImageData& imageData)
{
    // open the file if we can
    FILE *file;
    file = fopen(fileName, "rb");
    if (!file)
        return false;

    // read the headers if we can
    BITMAPFILEHEADER header;
    BITMAPINFOHEADER infoHeader;
    if (fread(&header, sizeof(header), 1, file) != 1 ||
        fread(&infoHeader, sizeof(infoHeader), 1, file) != 1 ||
        header.bfType != 0x4D42 || infoHeader.biBitCount != 24)
    {
        fclose(file);
        return false;
    }

    // read in our pixel data if we can. Note that it's in BGR order, and width is padded to the next power of 4
    imageData.m_pixels.resize(infoHeader.biSizeImage);
    fseek(file, header.bfOffBits, SEEK_SET);
    if (fread(&imageData.m_pixels[0], imageData.m_pixels.size(), 1, file) != 1)
    {
        fclose(file);
        return false;
    }

    imageData.m_width = infoHeader.biWidth;
    imageData.m_height = infoHeader.biHeight;

    imageData.m_pitch = imageData.m_width*3;
    if (imageData.m_pitch & 3)
    {
        imageData.m_pitch &= ~3;
        imageData.m_pitch += 4;
    }

    fclose(file);
    return true;
}

bool SaveImage (const char *fileName, const SImageData &image)
{
    // open the file if we can
    FILE *file;
    file = fopen(fileName, "wb");
    if (!file)
        return false;

    // make the header info
    BITMAPFILEHEADER header;
    BITMAPINFOHEADER infoHeader;

    header.bfType = 0x4D42;
    header.bfReserved1 = 0;
    header.bfReserved2 = 0;
    header.bfOffBits = 54;

    infoHeader.biSize = 40;
    infoHeader.biWidth = image.m_width;
    infoHeader.biHeight = image.m_height;
    infoHeader.biPlanes = 1;
    infoHeader.biBitCount = 24;
    infoHeader.biCompression = 0;
    infoHeader.biSizeImage = image.m_pixels.size();
    infoHeader.biXPelsPerMeter = 0;
    infoHeader.biYPelsPerMeter = 0;
    infoHeader.biClrUsed = 0;
    infoHeader.biClrImportant = 0;

    header.bfSize = infoHeader.biSizeImage + header.bfOffBits;

    // write the data and close the file
    fwrite(&header, sizeof(header), 1, file);
    fwrite(&infoHeader, sizeof(infoHeader), 1, file);
    fwrite(&image.m_pixels[0], infoHeader.biSizeImage, 1, file);
    fclose(file);
    return true;
}

int PixelsNeededForSigma (float sigma)
{
    // returns the number of pixels needed to represent a gaussian kernal that has values
    // down to the threshold amount.  A gaussian function technically has values everywhere
    // on the image, but the threshold lets us cut it off where the pixels contribute to
    // only small amounts that aren't as noticeable.
    const float c_threshold = 0.005f; // 0.5%
    return int(floor(1.0f + 2.0f * sqrtf(-2.0f * sigma * sigma * log(c_threshold)))) + 1;
}

float Gaussian (float sigma, float x)
{
    return expf(-(x*x) / (2.0f * sigma*sigma));
}

float GaussianSimpsonIntegration (float sigma, float a, float b)
{
    return
        ((b - a) / 6.0f) *
        (Gaussian(sigma, a) + 4.0f * Gaussian(sigma, (a + b) / 2.0f) + Gaussian(sigma, b));
}

std::vector<float> GaussianKernelIntegrals (float sigma, int taps)
{
    std::vector<float> ret;
    float total = 0.0f;
    for (int i = 0; i < taps; ++i)
    {
        float x = float(i) - float(taps / 2);
        float value = GaussianSimpsonIntegration(sigma, x - 0.5f, x + 0.5f);
        ret.push_back(value);
        total += value;
    }
    // normalize it
    for (unsigned int i = 0; i < ret.size(); ++i)
    {
        ret[i] /= total;
    }
    return ret;
}

const uint8* GetPixelOrBlack (const SImageData& image, int x, int y)
{
    static const uint8 black[3] = { 0, 0, 0 };
    if (x < 0 || x >= image.m_width ||
        y < 0 || y >= image.m_height)
    {
        return black;
    }

    return &image.m_pixels[(y * image.m_pitch) + x * 3];
}

void BlurImage (const SImageData& srcImage, SImageData &destImage, float xblursigma, float yblursigma, unsigned int xblursize, unsigned int yblursize)
{
    // allocate space for copying the image for destImage and tmpImage
    destImage.m_width = srcImage.m_width;
    destImage.m_height = srcImage.m_height;
    destImage.m_pitch = srcImage.m_pitch;
    destImage.m_pixels.resize(destImage.m_height * destImage.m_pitch);

    SImageData tmpImage;
    tmpImage.m_width = srcImage.m_width;
    tmpImage.m_height = srcImage.m_height;
    tmpImage.m_pitch = srcImage.m_pitch;
    tmpImage.m_pixels.resize(tmpImage.m_height * tmpImage.m_pitch);

    // horizontal blur from srcImage into tmpImage
    {
        auto row = GaussianKernelIntegrals(xblursigma, xblursize);

        int startOffset = -1 * int(row.size() / 2);

        for (int y = 0; y < tmpImage.m_height; ++y)
        {
            for (int x = 0; x < tmpImage.m_width; ++x)
            {
                std::array<float, 3> blurredPixel = { 0.0f, 0.0f, 0.0f };
                for (unsigned int i = 0; i < row.size(); ++i)
                {
                    const uint8 *pixel = GetPixelOrBlack(srcImage, x + startOffset + i, y);
                    blurredPixel[0] += float(pixel[0]) * row[i];
                    blurredPixel[1] += float(pixel[1]) * row[i];
                    blurredPixel[2] += float(pixel[2]) * row[i];
                }

                uint8 *destPixel = &tmpImage.m_pixels[y * tmpImage.m_pitch + x * 3];

                destPixel[0] = uint8(blurredPixel[0]);
                destPixel[1] = uint8(blurredPixel[1]);
                destPixel[2] = uint8(blurredPixel[2]);
            }
        }
    }

    // vertical blur from tmpImage into destImage
    {
        auto row = GaussianKernelIntegrals(yblursigma, yblursize);

        int startOffset = -1 * int(row.size() / 2);

        for (int y = 0; y < destImage.m_height; ++y)
        {
            for (int x = 0; x < destImage.m_width; ++x)
            {
                std::array<float, 3> blurredPixel = { 0.0f, 0.0f, 0.0f };
                for (unsigned int i = 0; i < row.size(); ++i)
                {
                    const uint8 *pixel = GetPixelOrBlack(tmpImage, x, y + startOffset + i);
                    blurredPixel[0] += float(pixel[0]) * row[i];
                    blurredPixel[1] += float(pixel[1]) * row[i];
                    blurredPixel[2] += float(pixel[2]) * row[i];
                }

                uint8 *destPixel = &destImage.m_pixels[y * destImage.m_pitch + x * 3];

                destPixel[0] = uint8(blurredPixel[0]);
                destPixel[1] = uint8(blurredPixel[1]);
                destPixel[2] = uint8(blurredPixel[2]);
            }
        }
    }
}

int main (int argc, char **argv)
{
    float xblursigma, yblursigma;

    bool showUsage = argc < 5 ||
        (sscanf(argv[3], "%f", &xblursigma) != 1) ||
        (sscanf(argv[4], "%f", &yblursigma) != 1);

    char *srcFileName = argv[1];
    char *destFileName = argv[2];

    if (showUsage)
    {
        printf("Usage: <source> <dest> <xblur> <yblur>nBlur values are sigmann");
        WaitForEnter();
        return 1;
    }

    // calculate pixel sizes, and make sure they are odd
    int xblursize = PixelsNeededForSigma(xblursigma) | 1;
    int yblursize = PixelsNeededForSigma(yblursigma) | 1;

    printf("Attempting to blur a 24 bit image.n");
    printf("  Source=%sn  Dest=%sn  blur=[%0.1f, %0.1f] px=[%d,%d]nn", srcFileName, destFileName, xblursigma, yblursigma, xblursize, yblursize);

    SImageData srcImage;
    if (LoadImage(srcFileName, srcImage))
    {
        printf("%s loadedn", srcFileName);
        SImageData destImage;
        BlurImage(srcImage, destImage, xblursigma, yblursigma, xblursize, yblursize);
        if (SaveImage(destFileName, destImage))
            printf("Blurred image saved as %sn", destFileName);
        else
        {
            printf("Could not save blurred image as %sn", destFileName);
            WaitForEnter();
            return 1;
        }
    }
    else
    {
        printf("could not read 24 bit bmp file %snn", srcFileName);
        WaitForEnter();
        return 1;
    }
    return 0;
}

Here is a really great explanation of the Gaussian blur.
Gaussian Blur – Image processing for scientists and engineers, Part 4
I highly recommend reading the 6 part series about image processing (DSP) from the beginning because it’s really informative and very easy to read!
Images are data – Image processing for scientists and engineers, Part 1

The Gaussian Kernel
Gaussian Kernel Calculator
DSP Stack Exchange: Gaussian Blur – standard deviation, radius and kernel size
Wikipedia: Gaussian blur

If you want to take this from theory / hobby level up to pro level, give this link a read from intel:
Intel: An investigation of fast real-time GPU-based image blur algorithms

Box Blur

If you ever have heard the terms “Box Blur”, “Boxcar Function”, “Box Filter”, “Boxcar Integrator” or other various combinations of those words, you may have thought it was some advanced concept that is hard to understand and hard to implement. If that’s what you thought, prepare to be surprised!

A box filter is nothing more than taking N samples of data (or NxN samples of data, or NxNxN etc) and averaging them! Yes, that is all there is to it 😛

In this post, we are going to implement a box blur by averaging pixels.

1D Case

For the case of a 1d box filter, let’s say we wanted every data point to be the result of averaging it with it’s two neighbors. It’d be easy enough to program that by just doing it, but let’s look at it a different way. What weight would we need to multiply each of the three values by (the value and it’s two neighbors) to make it come up with the average?

Yep, you guessed it! For every data value, you multiply it and it’s neighbors by 1/3 to come up with the average value. We could easily increase the size of the filter to 5 pixels, and multiply each pixel by 1/5 instead. We could continue the pattern as high as we wanted.

One thing you might notice is that if we want a buffer with all the results, we can’t just alter the source data as we go, because we want the unaltered source values of the data to use those weights with, to get the correct results. Because of that, we need to make a second buffer to put the results of the filtering into.

Believe it or not, that diagram above is a convolution kernel, and how we talked about applying it is how you do convolution in 1d! It just so happens that this convolution kernel averages three pixels into one, which also happens to provide a low pass filter type effect.

Low pass filtering is what is done before down sampling audio data to prevent aliasing (frequencies higher than the sample rate can handle, which makes audio sound bad).

Surprise… blurring can also be seen as low pass filtering, which is something you can do before scaling an image down in size, to prevent aliasing.

2D Case

The 2d case isn’t much more difficult to understand than the 1d case. Instead of only averaging on one axis, we average on two instead:

Something interesting to note is that you can either use this 3×3 2d convolution kernel, or, you could apply the 1d convolution kernel described above on the X axis and then the Y axis. The methods are mathematically equivalent.

Using the 2d convolution kernel would result in 9 multiplications per pixel, but if going with the separated axis X and then Y 1d kernel, you’d only end up doing 6 multiplications per pixel (3 multiplications per axis). In general, if you have a seperable 2d convolution kernel (meaning that you can break it into a per axis 1d convolution), you will end up doing N^2 multiplications when using the 2d kernel, versus N*2 multiplications when using the 1d kernels. You can see that this would add up quickly in favor of using 1d kernels, but unfortunately not all kernels are separable.

Doing two passes does come at a cost though. Since you have to use a temporary buffer for each pass, you end up having to create two temporary buffers instead of one.

You can build 2d kernels from 1d kernels by multiplying them as a row vector, by a column vector. For instance, you can see how multiplying the (1/3,1/3,1/3) kernel by itself as a column vector would create the 2nd kernel, that is 3×3 and has 1/9 in every spot.

The resulting 3×3 matrix is called an outer product, or a tensor product. Something interesting to note is that you don’t have to do the same operation on each axis!

Examples

Here are some examples of box blurring with different values, using the sample code provided below.

The source image:

Now blurred by a 10×10 box car convolution kernel:

Now blurred by a 100×10 box car convolution kernel:

Shadertoy

You can find a shadertoy implementation of box blurring here: Shadertoy:DF Box Blur

Code

Here’s the code I used to blur the example images above:

#define _CRT_SECURE_NO_WARNINGS
  
#include <stdio.h>
#include <stdint.h>
#include <array>
#include <vector>
#include <functional>
#include <windows.h>  // for bitmap headers.  Sorry non windows people!
  
typedef uint8_t uint8;
 
const float c_pi = 3.14159265359f;
 
struct SImageData
{
    SImageData()
        : m_width(0)
        , m_height(0)
    { }
  
    long m_width;
    long m_height;
    long m_pitch;
    std::vector<uint8> m_pixels;
};
  
void WaitForEnter ()
{
    printf("Press Enter to quit");
    fflush(stdin);
    getchar();
}
  
bool LoadImage (const char *fileName, SImageData& imageData)
{
    // open the file if we can
    FILE *file;
    file = fopen(fileName, "rb");
    if (!file)
        return false;
  
    // read the headers if we can
    BITMAPFILEHEADER header;
    BITMAPINFOHEADER infoHeader;
    if (fread(&header, sizeof(header), 1, file) != 1 ||
        fread(&infoHeader, sizeof(infoHeader), 1, file) != 1 ||
        header.bfType != 0x4D42 || infoHeader.biBitCount != 24)
    {
        fclose(file);
        return false;
    }
  
    // read in our pixel data if we can. Note that it's in BGR order, and width is padded to the next power of 4
    imageData.m_pixels.resize(infoHeader.biSizeImage);
    fseek(file, header.bfOffBits, SEEK_SET);
    if (fread(&imageData.m_pixels[0], imageData.m_pixels.size(), 1, file) != 1)
    {
        fclose(file);
        return false;
    }
  
    imageData.m_width = infoHeader.biWidth;
    imageData.m_height = infoHeader.biHeight;
  
    imageData.m_pitch = imageData.m_width*3;
    if (imageData.m_pitch & 3)
    {
        imageData.m_pitch &= ~3;
        imageData.m_pitch += 4;
    }
  
    fclose(file);
    return true;
}
  
bool SaveImage (const char *fileName, const SImageData &image)
{
    // open the file if we can
    FILE *file;
    file = fopen(fileName, "wb");
    if (!file)
        return false;
  
    // make the header info
    BITMAPFILEHEADER header;
    BITMAPINFOHEADER infoHeader;
  
    header.bfType = 0x4D42;
    header.bfReserved1 = 0;
    header.bfReserved2 = 0;
    header.bfOffBits = 54;
  
    infoHeader.biSize = 40;
    infoHeader.biWidth = image.m_width;
    infoHeader.biHeight = image.m_height;
    infoHeader.biPlanes = 1;
    infoHeader.biBitCount = 24;
    infoHeader.biCompression = 0;
    infoHeader.biSizeImage = image.m_pixels.size();
    infoHeader.biXPelsPerMeter = 0;
    infoHeader.biYPelsPerMeter = 0;
    infoHeader.biClrUsed = 0;
    infoHeader.biClrImportant = 0;
  
    header.bfSize = infoHeader.biSizeImage + header.bfOffBits;
  
    // write the data and close the file
    fwrite(&header, sizeof(header), 1, file);
    fwrite(&infoHeader, sizeof(infoHeader), 1, file);
    fwrite(&image.m_pixels[0], infoHeader.biSizeImage, 1, file);
    fclose(file);
    return true;
}

const uint8* GetPixelOrBlack (const SImageData& image, int x, int y)
{
    static const uint8 black[3] = { 0, 0, 0 };
    if (x < 0 || x >= image.m_width ||
        y < 0 || y >= image.m_height)
    {
        return black;
    }
 
    return &image.m_pixels[(y * image.m_pitch) + x * 3];
}
 
void BlurImage (const SImageData& srcImage, SImageData &destImage, unsigned int xblur, unsigned int yblur)
{
    // allocate space for copying the image for destImage and tmpImage
    destImage.m_width = srcImage.m_width;
    destImage.m_height = srcImage.m_height;
    destImage.m_pitch = srcImage.m_pitch;
    destImage.m_pixels.resize(destImage.m_height * destImage.m_pitch);
 
    SImageData tmpImage;
    tmpImage.m_width = srcImage.m_width;
    tmpImage.m_height = srcImage.m_height;
    tmpImage.m_pitch = srcImage.m_pitch;
    tmpImage.m_pixels.resize(tmpImage.m_height * tmpImage.m_pitch);
 
    // horizontal blur from srcImage into tmpImage
    {
        float weight = 1.0f / float(xblur);
        int half = xblur / 2;
        for (int y = 0; y < tmpImage.m_height; ++y)
        {
            for (int x = 0; x < tmpImage.m_width; ++x)
            {
                std::array<float, 3> blurredPixel = { 0.0f, 0.0f, 0.0f };
                for (int i = -half; i <= half; ++i)
                {
                    const uint8 *pixel = GetPixelOrBlack(srcImage, x + i, y);
                    blurredPixel[0] += float(pixel[0]) * weight;
                    blurredPixel[1] += float(pixel[1]) * weight;
                    blurredPixel[2] += float(pixel[2]) * weight;
                }
                 
                uint8 *destPixel = &tmpImage.m_pixels[y * tmpImage.m_pitch + x * 3];
 
                destPixel[0] = uint8(blurredPixel[0]);
                destPixel[1] = uint8(blurredPixel[1]);
                destPixel[2] = uint8(blurredPixel[2]);
            }
        }
    }
 
    // vertical blur from tmpImage into destImage
    {
        float weight = 1.0f / float(yblur);
        int half = yblur / 2;
 
        for (int y = 0; y < destImage.m_height; ++y)
        {
            for (int x = 0; x < destImage.m_width; ++x)
            {
                std::array<float, 3> blurredPixel = { 0.0f, 0.0f, 0.0f };
                for (int i = -half; i <= half; ++i)
                {
                    const uint8 *pixel = GetPixelOrBlack(tmpImage, x, y + i);
                    blurredPixel[0] += float(pixel[0]) * weight;
                    blurredPixel[1] += float(pixel[1]) * weight;
                    blurredPixel[2] += float(pixel[2]) * weight;
                }
 
                uint8 *destPixel = &destImage.m_pixels[y * destImage.m_pitch + x * 3];
 
                destPixel[0] = uint8(blurredPixel[0]);
                destPixel[1] = uint8(blurredPixel[1]);
                destPixel[2] = uint8(blurredPixel[2]);
            }
        }
    }
}
 
int main (int argc, char **argv)
{
    int xblur, yblur;
  
    bool showUsage = argc < 5 ||
        (sscanf(argv[3], "%i", &xblur) != 1) ||
        (sscanf(argv[4], "%i", &yblur) != 1);
  
    char *srcFileName = argv[1];
    char *destFileName = argv[2];
  
    if (showUsage)
    {
        printf("Usage: <source> <dest> <xblur> <yblur>nn");
        WaitForEnter();
        return 1;
    }
     
    // make sure blur size is odd
    xblur = xblur | 1;
    yblur = yblur | 1;
 
    printf("Attempting to blur a 24 bit image.n");
    printf("  Source=%sn  Dest=%sn  blur=[%d,%d]nn", srcFileName, destFileName, xblur, yblur);
  
    SImageData srcImage;
    if (LoadImage(srcFileName, srcImage))
    {
        printf("%s loadedn", srcFileName);
        SImageData destImage;
        BlurImage(srcImage, destImage, xblur, yblur);
        if (SaveImage(destFileName, destImage))
            printf("Blurred image saved as %sn", destFileName);
        else
        {
            printf("Could not save blurred image as %sn", destFileName);
            WaitForEnter();
            return 1;
        }
    }
    else
    {
        printf("could not read 24 bit bmp file %snn", srcFileName);
        WaitForEnter();
        return 1;
    }
    return 0;
}

Next Up

Next up will be a Gaussian blur, and I’m nearly done w/ that post but wanted to make this one first as an introductory step!

Before we get there, I wanted to mention that if you do multiple box blurs in a row, it will start to approach Gaussian blurring. I’ve heard that three blurs in a row will make it basically indistinguishable from a Gaussian blur.

Resizing Images With Bicubic Interpolation

In the last post we saw how to do cubic interpolation on a grid of data.

Strangely enough, when that grid is a grid of pixel data, bicubic interpolation is a common method for resizing images!

Bicubic interpolation can also used in realtime rendering to make textures look nicer when scaled than standard bilinear texture interpolation.

This technique works when making images larger as well as smaller, but when making images smaller, you can still have problems with aliasing. There are are better algorithms to use when making an image smaller. Check the links section at the bottom for more details!

Example

Here’s the old man from The Legend of Zelda who gives you the sword.

Here he is scaled up 4x with nearest neighbor, bilinear interpolation and bicubic interpolation.


Here he is scaled up 16x with nearest neighbor, bilinear interpolation and bicubic interpolation.


Shadertoy

I made a shadertoy to show you how to do this in a GLSL pixel shader as well. Shadertoy: Bicubic Texture Filtering

In the screenshot below, going from left to right it uses: Nearest Neighbor, Bilinear, Lagrange Bicubic interpolation (only interpolates values, not slopes), Hermite Bicubic interpolation.

Sample Code

Here’s the code that I used to resize the images in the examples above.

#define _CRT_SECURE_NO_WARNINGS

#include <stdio.h>
#include <stdint.h>
#include <array>
#include <vector>
#include <windows.h>  // for bitmap headers.  Sorry non windows people!

#define CLAMP(v, min, max) if (v < min) { v = min; } else if (v > max) { v = max; } 

typedef uint8_t uint8;

struct SImageData
{
    SImageData()
        : m_width(0)
        , m_height(0)
    { }

    long m_width;
    long m_height;
    long m_pitch;
    std::vector<uint8> m_pixels;
};

void WaitForEnter ()
{
    printf("Press Enter to quit");
    fflush(stdin);
    getchar();
}

bool LoadImage (const char *fileName, SImageData& imageData)
{
    // open the file if we can
    FILE *file;
    file = fopen(fileName, "rb");
    if (!file)
        return false;

    // read the headers if we can
    BITMAPFILEHEADER header;
    BITMAPINFOHEADER infoHeader;
    if (fread(&header, sizeof(header), 1, file) != 1 ||
        fread(&infoHeader, sizeof(infoHeader), 1, file) != 1 ||
        header.bfType != 0x4D42 || infoHeader.biBitCount != 24)
    {
        fclose(file);
        return false;
    }

    // read in our pixel data if we can. Note that it's in BGR order, and width is padded to the next power of 4
    imageData.m_pixels.resize(infoHeader.biSizeImage);
    fseek(file, header.bfOffBits, SEEK_SET);
    if (fread(&imageData.m_pixels[0], imageData.m_pixels.size(), 1, file) != 1)
    {
        fclose(file);
        return false;
    }

    imageData.m_width = infoHeader.biWidth;
    imageData.m_height = infoHeader.biHeight;

    imageData.m_pitch = imageData.m_width*3;
    if (imageData.m_pitch & 3)
    {
        imageData.m_pitch &= ~3;
        imageData.m_pitch += 4;
    }

    fclose(file);
    return true;
}

bool SaveImage (const char *fileName, const SImageData &image)
{
    // open the file if we can
    FILE *file;
    file = fopen(fileName, "wb");
    if (!file)
        return false;

    // make the header info
    BITMAPFILEHEADER header;
    BITMAPINFOHEADER infoHeader;

    header.bfType = 0x4D42;
    header.bfReserved1 = 0;
    header.bfReserved2 = 0;
    header.bfOffBits = 54;

    infoHeader.biSize = 40;
    infoHeader.biWidth = image.m_width;
    infoHeader.biHeight = image.m_height;
    infoHeader.biPlanes = 1;
    infoHeader.biBitCount = 24;
    infoHeader.biCompression = 0;
    infoHeader.biSizeImage = image.m_pixels.size();
    infoHeader.biXPelsPerMeter = 0;
    infoHeader.biYPelsPerMeter = 0;
    infoHeader.biClrUsed = 0;
    infoHeader.biClrImportant = 0;

    header.bfSize = infoHeader.biSizeImage + header.bfOffBits;

    // write the data and close the file
    fwrite(&header, sizeof(header), 1, file);
    fwrite(&infoHeader, sizeof(infoHeader), 1, file);
    fwrite(&image.m_pixels[0], infoHeader.biSizeImage, 1, file);
    fclose(file);
    return true;
}

// t is a value that goes from 0 to 1 to interpolate in a C1 continuous way across uniformly sampled data points.
// when t is 0, this will return B.  When t is 1, this will return C.  Inbetween values will return an interpolation
// between B and C.  A and B are used to calculate slopes at the edges.
float CubicHermite (float A, float B, float C, float D, float t)
{
    float a = -A / 2.0f + (3.0f*B) / 2.0f - (3.0f*C) / 2.0f + D / 2.0f;
    float b = A - (5.0f*B) / 2.0f + 2.0f*C - D / 2.0f;
    float c = -A / 2.0f + C / 2.0f;
    float d = B;

    return a*t*t*t + b*t*t + c*t + d;
}

float Lerp (float A, float B, float t)
{
    return A * (1.0f - t) + B * t;
}

const uint8* GetPixelClamped (const SImageData& image, int x, int y)
{
    CLAMP(x, 0, image.m_width - 1);
    CLAMP(y, 0, image.m_height - 1);    
    return &image.m_pixels[(y * image.m_pitch) + x * 3];
}

std::array<uint8, 3> SampleNearest (const SImageData& image, float u, float v)
{
    // calculate coordinates
    int xint = int(u * image.m_width);
    int yint = int(v * image.m_height);

    // return pixel
    auto pixel = GetPixelClamped(image, xint, yint);
    std::array<uint8, 3> ret;
    ret[0] = pixel[0];
    ret[1] = pixel[1];
    ret[2] = pixel[2];
    return ret;
}

std::array<uint8, 3> SampleLinear (const SImageData& image, float u, float v)
{
    // calculate coordinates -> also need to offset by half a pixel to keep image from shifting down and left half a pixel
    float x = (u * image.m_width) - 0.5f;
    int xint = int(x);
    float xfract = x - floor(x);

    float y = (v * image.m_height) - 0.5f;
    int yint = int(y);
    float yfract = y - floor(y);

    // get pixels
    auto p00 = GetPixelClamped(image, xint + 0, yint + 0);
    auto p10 = GetPixelClamped(image, xint + 1, yint + 0);
    auto p01 = GetPixelClamped(image, xint + 0, yint + 1);
    auto p11 = GetPixelClamped(image, xint + 1, yint + 1);

    // interpolate bi-linearly!
    std::array<uint8, 3> ret;
    for (int i = 0; i < 3; ++i)
    {
        float col0 = Lerp(p00[i], p10[i], xfract);
        float col1 = Lerp(p01[i], p11[i], xfract);
        float value = Lerp(col0, col1, yfract);
        CLAMP(value, 0.0f, 255.0f);
        ret[i] = uint8(value);
    }
    return ret;
}

std::array<uint8, 3> SampleBicubic (const SImageData& image, float u, float v)
{
    // calculate coordinates -> also need to offset by half a pixel to keep image from shifting down and left half a pixel
    float x = (u * image.m_width) - 0.5;
    int xint = int(x);
    float xfract = x - floor(x);

    float y = (v * image.m_height) - 0.5;
    int yint = int(y);
    float yfract = y - floor(y);

    // 1st row
    auto p00 = GetPixelClamped(image, xint - 1, yint - 1);
    auto p10 = GetPixelClamped(image, xint + 0, yint - 1);
    auto p20 = GetPixelClamped(image, xint + 1, yint - 1);
    auto p30 = GetPixelClamped(image, xint + 2, yint - 1);

    // 2nd row
    auto p01 = GetPixelClamped(image, xint - 1, yint + 0);
    auto p11 = GetPixelClamped(image, xint + 0, yint + 0);
    auto p21 = GetPixelClamped(image, xint + 1, yint + 0);
    auto p31 = GetPixelClamped(image, xint + 2, yint + 0);

    // 3rd row
    auto p02 = GetPixelClamped(image, xint - 1, yint + 1);
    auto p12 = GetPixelClamped(image, xint + 0, yint + 1);
    auto p22 = GetPixelClamped(image, xint + 1, yint + 1);
    auto p32 = GetPixelClamped(image, xint + 2, yint + 1);

    // 4th row
    auto p03 = GetPixelClamped(image, xint - 1, yint + 2);
    auto p13 = GetPixelClamped(image, xint + 0, yint + 2);
    auto p23 = GetPixelClamped(image, xint + 1, yint + 2);
    auto p33 = GetPixelClamped(image, xint + 2, yint + 2);

    // interpolate bi-cubically!
    // Clamp the values since the curve can put the value below 0 or above 255
    std::array<uint8, 3> ret;
    for (int i = 0; i < 3; ++i)
    {
        float col0 = CubicHermite(p00[i], p10[i], p20[i], p30[i], xfract);
        float col1 = CubicHermite(p01[i], p11[i], p21[i], p31[i], xfract);
        float col2 = CubicHermite(p02[i], p12[i], p22[i], p32[i], xfract);
        float col3 = CubicHermite(p03[i], p13[i], p23[i], p33[i], xfract);
        float value = CubicHermite(col0, col1, col2, col3, yfract);
        CLAMP(value, 0.0f, 255.0f);
        ret[i] = uint8(value);
    }
    return ret;
}

void ResizeImage (const SImageData &srcImage, SImageData &destImage, float scale, int degree)
{
    destImage.m_width = long(float(srcImage.m_width)*scale);
    destImage.m_height = long(float(srcImage.m_height)*scale);
    destImage.m_pitch = destImage.m_width * 3;
    if (destImage.m_pitch & 3)
    {
        destImage.m_pitch &= ~3;
        destImage.m_pitch += 4;
    }
    destImage.m_pixels.resize(destImage.m_pitch*destImage.m_height);

    uint8 *row = &destImage.m_pixels[0];
    for (int y = 0; y < destImage.m_height; ++y)
    {
        uint8 *destPixel = row;
        float v = float(y) / float(destImage.m_height - 1);
        for (int x = 0; x < destImage.m_width; ++x)
        {
            float u = float(x) / float(destImage.m_width - 1);
            std::array<uint8, 3> sample;

            if (degree == 0)
                sample = SampleNearest(srcImage, u, v);
            else if (degree == 1)
                sample = SampleLinear(srcImage, u, v);
            else if (degree == 2)
                sample = SampleBicubic(srcImage, u, v);

            destPixel[0] = sample[0];
            destPixel[1] = sample[1];
            destPixel[2] = sample[2];
            destPixel += 3;
        }
        row += destImage.m_pitch;
    }
}

int main (int argc, char **argv)
{
    float scale = 1.0f;
    int degree = 0;

    bool showUsage = argc < 5 ||
        (sscanf(argv[3], "%f", &scale) != 1) ||
        (sscanf(argv[4], "%i", &degree) != 1);

    char *srcFileName = argv[1];
    char *destFileName = argv[2];

    if (showUsage)
    {
        printf("Usage: <source> <dest> <scale> <degree>ndegree 0 = nearest, 1 = bilinear, 2 = bicubic.nn");
        WaitForEnter();
        return 1;
    }

    printf("Attempting to resize a 24 bit image.n");
    printf("  Source = %sn  Dest = %sn  Scale = %0.2fnn", srcFileName, destFileName, scale);

    SImageData srcImage;
    if (LoadImage(srcFileName, srcImage))
    {
        printf("%s loadedn", srcFileName);
        SImageData destImage;
        ResizeImage(srcImage, destImage, scale, degree);
        if (SaveImage(destFileName, destImage))
            printf("Resized image saved as %sn", destFileName);
        else
            printf("Could not save resized image as %sn", destFileName);
    }
    else
        printf("could not read 24 bit bmp file %snn", srcFileName);
    return 0;
}

Links

A small tutorial about how to load a bitmap file
The BMP Format
Reconstruction Filters in Computer Graphics

The link below talks about how to do cubic texture sampling on the GPU without having to do 16 texture reads!
GPU Gems 2 Chapter 20. Fast Third-Order Texture Filtering

This link is from Inigo Quilez, where he transforms a texture coordinate before passing it to the bilinear filtering, to get higher quality texture sampling without having to do extra texture reads. That is pretty cool.
IQ: improved texture interpolation

Cubic Hermite Rectangles

Time for another Frankenstein post. This time we are going to combine the following:

  1. Cubic Hermite Interpolation
  2. Rectangular Bezier Patches

The end result is going to be a Cubic Hermite Rectangle Surface like the below. Note that the curve only passes through the inner four control points, and the outer ring of 12 control points are used to determine the slope.

Just like the cubic hermite curve counterpart, a cubic hermite rectangle surface is C1 continuous everywhere, which is great for use as a way of modeling geometry, as well as just for interpolation of multidimensional data. In the image below, each checkerboard square is an individual hermite rectangle.

The links section at the bottom has links to the shadertoys I made that I got the screenshots from.

Code

Here’s some C++ code that does bicubic hermite interpolation

#include <stdio.h>
#include <array>
  
typedef std::array<float, 4> TFloat4;
typedef std::array<TFloat4, 4> TFloat4x4;
  
const TFloat4x4 c_ControlPointsX =
{
    {
        { 0.7f, 0.8f, 0.9f, 0.3f },
        { 0.2f, 0.5f, 0.4f, 0.1f },
        { 0.6f, 0.3f, 0.1f, 0.4f },
        { 0.8f, 0.4f, 0.2f, 0.7f },
    }
};
  
const TFloat4x4 c_ControlPointsY =
{
    {
        { 0.2f, 0.8f, 0.5f, 0.6f },
        { 0.6f, 0.9f, 0.3f, 0.8f },
        { 0.7f, 0.1f, 0.4f, 0.9f },
        { 0.6f, 0.5f, 0.3f, 0.2f },
    }
};
  
const TFloat4x4 c_ControlPointsZ =
{
    {
        { 0.6f, 0.5f, 0.3f, 0.2f },
        { 0.7f, 0.1f, 0.9f, 0.5f },
        { 0.8f, 0.4f, 0.2f, 0.7f },
        { 0.6f, 0.3f, 0.1f, 0.4f },
    }
};
  
void WaitForEnter ()
{
    printf("Press Enter to quit");
    fflush(stdin);
    getchar();
}
  
// t is a value that goes from 0 to 1 to interpolate in a C1 continuous way across uniformly sampled data points.
// when t is 0, this will return p[1].  When t is 1, this will return p[2].
// p[0] and p[3] are used to calculate slopes at the edges.
float CubicHermite(const TFloat4& p, float t)
{
    float a = -p[0] / 2.0f + (3.0f*p[1]) / 2.0f - (3.0f*p[2]) / 2.0f + p[3] / 2.0f;
    float b = p[0] - (5.0f*p[1]) / 2.0f + 2.0f*p[2] - p[3] / 2.0f;
    float c = -p[0] / 2.0f + p[2] / 2.0f;
    float d = p[1];

    return a*t*t*t + b*t*t + c*t + d;
}
  
float BicubicHermitePatch(const TFloat4x4& p, float u, float v)
{
    TFloat4 uValues;
    uValues[0] = CubicHermite(p[0], u);
    uValues[1] = CubicHermite(p[1], u);
    uValues[2] = CubicHermite(p[2], u);
    uValues[3] = CubicHermite(p[2], u);
    return CubicHermite(uValues, v);
}
  
int main(int argc, char **argv)
{
    // how many values to display on each axis. Limited by console resolution!
    const int c_numValues = 4;
  
    printf("Cubic Hermite rectangle:n");
    for (int i = 0; i < c_numValues; ++i)
    {
        float iPercent = ((float)i) / ((float)(c_numValues - 1));
        for (int j = 0; j < c_numValues; ++j)
        {
            if (j == 0)
                printf("  ");
            float jPercent = ((float)j) / ((float)(c_numValues - 1));
            float valueX = BicubicHermitePatch(c_ControlPointsX, jPercent, iPercent);
            float valueY = BicubicHermitePatch(c_ControlPointsY, jPercent, iPercent);
            float valueZ = BicubicHermitePatch(c_ControlPointsZ, jPercent, iPercent);
            printf("(%0.2f, %0.2f, %0.2f) ", valueX, valueY, valueZ);
        }
        printf("n");
    }
    printf("n");
  
    WaitForEnter();
    return 0;
}

And here’s the output. Note that the four corners of the output correspond to the four inner most points defined in the data!

On The GPU / Links

While cubic Hermite rectangles pass through all of their control points like Lagrange surfaces do (and like Bezier rectangle’s don’t), they don’t suffer from Runge’s Phenomenon like Lagrange surfaces do.

However, just like Lagrange surfaces, Hermite surfaces don’t have the nice property that Bezier surfaces have, where the surface is guaranteed to stay inside of the convex hull defined by the control points.

Since Hermite surfaces are just cubic functions though, you could calculate the minimum and maximum value that they can reach using some calculus and come up with a bounding box by going that direction. The same thing is technically true of Lagrange surfaces as well for what it’s worth.

Check out the links below to see cubic Hermite rectangles rendered in real time in WebGL using raytracing and raymarching:
Shadertoy: Cubic Hermite Rectangle
Shadertoy: Infinite Hermite Rectangles

Cubic Hermite Interpolation

It’s a big wide world of curves out there and I have to say that most of the time, I consider myself a Bezier man.

Well let me tell you… cubic Hermite splines are technically representable in Bezier form, but they have some really awesome properties that I never fully appreciated until recently.

Usefulness For Interpolation

If you have a set of data points on some fixed interval (like for audio data, but could be anything), you can use a cubic Hermite spline to interpolate between any two data points. It interpolates the value between those points (as in, it passes through both end points), but it also interpolates a derivative that is consistent if you approach the point from the left or the right.

In short, this means you can use cubic Hermite splines to interpolate data such that the result has C1 continuity everywhere!

Usefulness As Curves

If you have any number N 
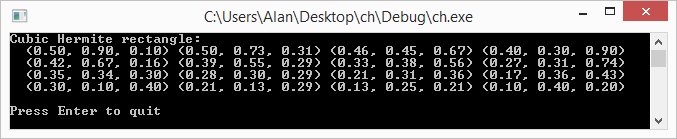
control points on a fixed interval, you can treat it as a bunch of piece wise cubic Hermite splines and evaluate it that way.

The end result is that you have a curve that is C1 continuous everywhere, it has local control (moving any control point only affects the two curve sections to the left and the two curve sections to the right), and best of all, the computational complexity doesn’t rise as you increase the number of control points!

The image below was taken as a screenshot from one of the HTML5 demos I made for you to play with. You can find links to them at the end of this post.

Cubic Hermite Splines

Cubic Hermite splines have four control points but how it uses the control points is a bit different than you’d expect.

The curve itself passes only through the middle two control points, and the end control points are there to help calculate the tangent at the middle control points.

Let’s say you have control points P_{-1}, P_0, P_1, P_2. The curve at time 0 will be at point P_0 and the slope will be the same slope as a line would have if going from P_{-1} to P_1. The curve at time 1 will be at point P_1 and the slope will be the same slope as a line would have if going from P_0 to P_2.

Check out the picture below to see what I mean visually.

That sounds like a strange set of properties, but they are actually super useful.

What this means is that you can treat any group of 4 control points / data points as a separate cubic hermite spline, but when you put it all together, it is a single smooth curve.

Note that you can either interpolate 1d data, or you can interpolate 2d data points by doing this interpolation on each axis. You could also use this to make a surface, which will likely be the next blog post!

The Math

I won’t go into how the formula is derived, but if you are interested you should check out Signal Processing: Bicubic Interpolation.

The formula is:

a*t^3+b*t^2+c*t+d

Where…

a = \frac{-P_{-1} + 3*P_0 - 3*P_1 + P_2}{2}
b = P_{-1} - \frac{5*P_0}{2} + 2*P_1 - \frac{P_2}{2}
c = \frac{-P_{-1} + P_1}{2}
d = P_0

Note that t is a value that goes from 0 to 1. When t is 0, your curve will be at P_1 and when t is 1, your curve will be at P_2. P_{-1} and P_{2} 
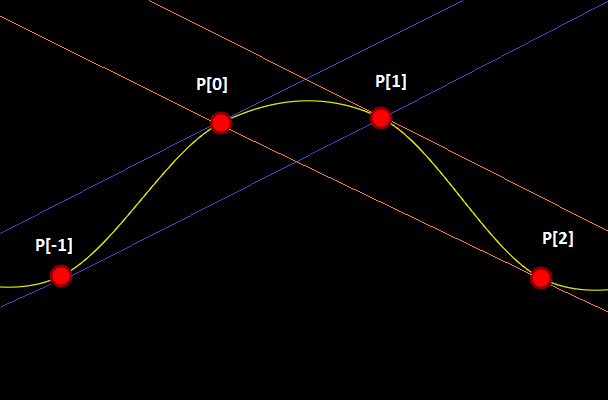
are used to be able to make this interpolation C1 continuous.

Here it is in some simple C++:

// t is a value that goes from 0 to 1 to interpolate in a C1 continuous way across uniformly sampled data points.
// when t is 0, this will return B.  When t is 1, this will return C.
static float CubicHermite (float A, float B, float C, float D, float t)
{
    float a = -A/2.0f + (3.0f*B)/2.0f - (3.0f*C)/2.0f + D/2.0f;
    float b = A - (5.0f*B)/2.0f + 2.0f*C - D / 2.0f;
    float c = -A/2.0f + C/2.0f;
    float d = B;

    return a*t*t*t + b*t*t + c*t + d;
}

Code

Here is an example C++ program that interpolates both 1D and 2D data.

#include <stdio.h>
#include <vector>
#include <array>
 
typedef std::vector<float> TPointList1D;
typedef std::vector<std::array<float,2>> TPointList2D;
 
void WaitForEnter ()
{
    printf("Press Enter to quit");
    fflush(stdin);
    getchar();
}

// t is a value that goes from 0 to 1 to interpolate in a C1 continuous way across uniformly sampled data points.
// when t is 0, this will return B.  When t is 1, this will return C.
float CubicHermite (float A, float B, float C, float D, float t)
{
    float a = -A/2.0f + (3.0f*B)/2.0f - (3.0f*C)/2.0f + D/2.0f;
    float b = A - (5.0f*B)/2.0f + 2.0f*C - D / 2.0f;
    float c = -A/2.0f + C/2.0f;
    float d = B;
 
    return a*t*t*t + b*t*t + c*t + d;
}

template <typename T>
inline T GetIndexClamped(const std::vector<T>& points, int index)
{
    if (index < 0)
        return points[0];
    else if (index >= int(points.size()))
        return points.back();
    else
        return points[index];
}

int main (int argc, char **argv)
{
    const float c_numSamples = 13;

    // show some 1d interpolated values
    {
        const TPointList1D points =
        {
            0.0f,
            1.6f,
            2.3f,
            3.5f,
            4.3f,
            5.9f,
            6.8f
        };

        printf("1d interpolated values.  y = f(t)n");
        for (int i = 0; i < c_numSamples; ++i)
        {
            float percent = ((float)i) / (float(c_numSamples - 1));
            float x = (points.size()-1) * percent;

            int index = int(x);
            float t = x - floor(x);
            float A = GetIndexClamped(points, index - 1);
            float B = GetIndexClamped(points, index + 0);
            float C = GetIndexClamped(points, index + 1);
            float D = GetIndexClamped(points, index + 2);

            float y = CubicHermite(A, B, C, D, t);
            printf("  Value at %0.2f = %0.2fn", x, y);
        }
        printf("n");
    }

    // show some 2d interpolated values
    {
        const TPointList2D points =
        {
            { 0.0f, 1.1f },
            { 1.6f, 8.3f },
            { 2.3f, 6.5f },
            { 3.5f, 4.7f },
            { 4.3f, 3.1f },
            { 5.9f, 7.5f },
            { 6.8f, 0.0f }
        };

        printf("2d interpolated values.  x = f(t), y = f(t)n");
        for (int i = 0; i < c_numSamples; ++i)
        {
            float percent = ((float)i) / (float(c_numSamples - 1));
            float x = 0.0f;
            float y = 0.0f;

            float tx = (points.size() -1) * percent;
            int index = int(tx);
            float t = tx - floor(tx);

            std::array<float, 2> A = GetIndexClamped(points, index - 1);
            std::array<float, 2> B = GetIndexClamped(points, index + 0);
            std::array<float, 2> C = GetIndexClamped(points, index + 1);
            std::array<float, 2> D = GetIndexClamped(points, index + 2);
            x = CubicHermite(A[0], B[0], C[0], D[0], t);
            y = CubicHermite(A[1], B[1], C[1], D[1], t);

            printf("  Value at %0.2f = (%0.2f, %0.2f)n", tx, x, y);
        }
        printf("n");
    }
 
    WaitForEnter();
    return 0;
}

The output of the program is below:

Links

Here are some interactive HTML5 demos i made:
1D cubic hermite interpolation
2D cubic hermite interpolation

More info here:
Wikipedia: Cubic Hermite Spline

Closely related to cubic hermite splines, catmull-rom splines allow you to specify a “tension” parameter to make the result more or less curvy:
Catmull-Rom spline

Lagrange Rectangles

In this post we are going to Frankenstein ideas from two other recent posts. If you haven’t seen these yet you should probably give them a read!

Ingredient 1: Lagrange interpolation
Ingredient 2: Rectangular Bezier Patches

Lagrange Surface

Lets say you have a grid of size MxN and you want to make a 3d surface for that grid.

You could use a Bezier rectangle but lets say that you really need the surface to pass through the control points. Bezier curves and surfaces only generally pass through the end / edge control points.

So what do you do? How about using Lagrange interpolation instead?

Just like how Bezier rectangles work, you interpolate on one axis, and then take those values and interpolate on the other axis.

Doing that, you get something like the below:

This comes at a price though. Whereas a Bezier curve or surface will be completely contained by it’s control points, a Lagrange rectangle isn’t always. Also, they are subject to something called Runge’s Phenomenon which basically means that the more control points you add, the more likely a surface is to get a bit “squirly”. You can see this effect when you add a lot of control points to my 1d lagrange interpolation demo as well: HTML5 1d Lagrange Interpolation.

Below is a picture of a bicubic Lagrange rectangle using the same control points the cubic Bezier rectangles used. Notice how much more extreme the peaks and valleys are! In the screenshot above, i scaled down the control points to 1/3 of what they were in the Bezier demo to make it look more reasonably well behaved.

Code

#include <stdio.h>
#include <array>
 
typedef std::array<float, 3> TFloat3;
typedef std::array<TFloat3, 3> TFloat3x3;
 
const TFloat3x3 c_ControlPointsX =
{
    {
        { 0.7f, 0.8f, 0.9f },
        { 0.2f, 0.5f, 0.4f },
        { 0.6f, 0.3f, 0.1f },
    }
};
 
const TFloat3x3 c_ControlPointsY =
{
    {
        { 0.2f, 0.8f, 0.5f },
        { 0.6f, 0.9f, 0.3f },
        { 0.7f, 0.1f, 0.4f },
    }
};
 
const TFloat3x3 c_ControlPointsZ =
{
    {
        { 0.6f, 0.5f, 0.3f },
        { 0.7f, 0.1f, 0.9f },
        { 0.8f, 0.4f, 0.2f },
    }
};
 
void WaitForEnter ()
{
    printf("Press Enter to quit");
    fflush(stdin);
    getchar();
}
 
//=======================================================================================
float QuadraticLagrange (const TFloat3& p, float t)
{
	float c_x0 = 0.0 / 2.0;
	float c_x1 = 1.0 / 2.0;
	float c_x2 = 2.0 / 2.0;

    return
        p[0] * 
        (
            (t - c_x1) / (c_x0 - c_x1) * 
            (t - c_x2) / (c_x0 - c_x2)
        ) +
        p[1] * 
        (
            (t - c_x0) / (c_x1 - c_x0) * 
            (t - c_x2) / (c_x1 - c_x2)
        ) +
        p[2] * 
        (
            (t - c_x0) / (c_x2 - c_x0) * 
            (t - c_x1) / (c_x2 - c_x1)
        );
}
 
float BiquadraticLagrangePatch(const TFloat3x3& p, float u, float v)
{
    TFloat3 uValues;
    uValues[0] = QuadraticLagrange(p[0], u);
    uValues[1] = QuadraticLagrange(p[1], u);
    uValues[2] = QuadraticLagrange(p[2], u);
    return QuadraticLagrange(uValues, v);
}
 
int main(int argc, char **argv)
{
    // how many values to display on each axis. Limited by console resolution!
    const int c_numValues = 4;
 
    printf("Lagrange rectangle:n");
    for (int i = 0; i < c_numValues; ++i)
    {
        float iPercent = ((float)i) / ((float)(c_numValues - 1));
        for (int j = 0; j < c_numValues; ++j)
        {
            if (j == 0)
                printf("  ");
            float jPercent = ((float)j) / ((float)(c_numValues - 1));
            float valueX = BiquadraticLagrangePatch(c_ControlPointsX, jPercent, iPercent);
            float valueY = BiquadraticLagrangePatch(c_ControlPointsY, jPercent, iPercent);
            float valueZ = BiquadraticLagrangePatch(c_ControlPointsZ, jPercent, iPercent);
            printf("(%0.2f, %0.2f, %0.2f) ", valueX, valueY, valueZ);
        }
        printf("n");
    }
    printf("n");
 
    WaitForEnter();
    return 0;
}

And here is the output:

Compare that to the output of the Bezier rectangles code which used the same control points:

Links

Shadertoy: Cubic Lagrange Rectangle

Note that the above uses Lagrange interpolation on a grid. The paper below talks about a way to make a Lagrange surface without using a grid:
A Simple Expression for Multivariate Lagrange Interpolation

Finite Differences

Finite differences are numerical methods for approximating function derivatives – otherwise known as the slope of a function at a specific point on the graph. This can be helpful if it’s undesirable or impossible to calculate the actual derivative of a specific function.

This post talks about three methods: central difference, backwards difference and forward difference. They are all based on evaluating the function at two points and using the slope between those points as the derivative estimate.

The distance between those sample points is called an epsilon, and the smaller it is, the more accurate the approximation is in theory. In practice, extremely small values (like FLT_MIN) may hit numerical problems due to floating points number usage, and also you could hit performance problems due to using floating point denormals. Check the links section at the bottom for more info on denormals.

Central Difference

The central difference is the most accurate technique of the three. You can find information about comparitive accuracy of these three techniques in the links section at the end. In practical terms, this may also be the slowest method too – or the most computationally expensive – which i’ll explain further down.

If you want to know the derivative of some function y=f(x) 
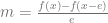
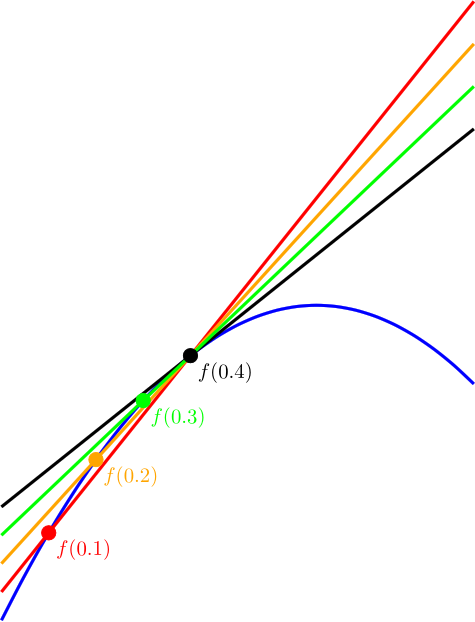
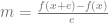
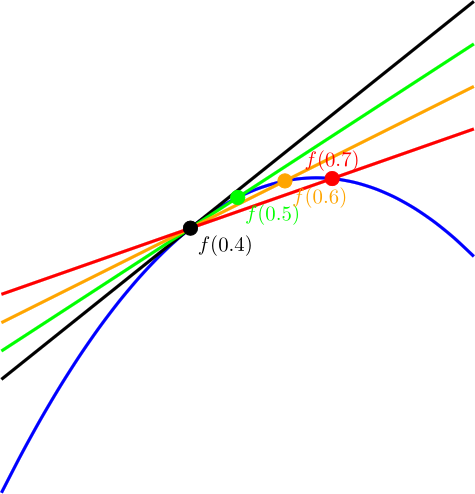
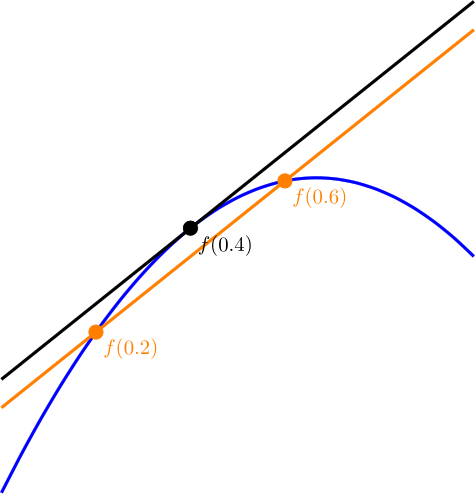
at a specific value of x, you pick an epsilon e and then you calculate both f(x-e) and f(x+e). You subtract the first one from the second and divide by 2*e to get an approximated slope of the function at the specific value of x.

Remembering that the slope is just rise over run, and that the derivative at a point on a function is just the slope of the function at that point, this should hopefully make sense and be pretty intuitive why it works.

The resulting equation looks like:

m = \frac{f(x+e)-f(x-e)}{2e}

This process is visualized below. The black line is the actual slope at 0.4 and the orange line is the estimated slope. The orange dots are the sample points taken. The epsilon in this case is 0.2.

Interestingly, when dealing with quadratic (or linear) functions, the central difference method will give you the correct result. The picture above uses a quadratic function, so you can see no matter what value of e we use, it will always be parallel to the actual slope at that point. For cubic and higher functions, that won’t always be true.

Backward Difference

The backward difference works just like the central difference except uses different sample points. It evaluates f(x-e) and f(x), subtracts the 1st one from the second one and divides the result by e.

The resulting equation looks like this:

m = \frac{f(x)-f(x-e)}{e}

A neat property shared by both this and the forward difference is that many times you are already going to be evaluating f(x) for other uses, so in practice this will just mean that you only have to evaluate f(x-e), and will already have the f(x) value. That can make it more efficient than the central difference method, but it can be less precise.

Also, if you are walking down a function (say, rendering a Bezier curve, and wanting the slope at each point to do something with), you may very well be able to use the f(x) of the previous point as your f(x-e) function, which means that you could possibly calculate the backwards difference by using the previous point, instead of evaluating the function extra times in your loop!

Check out the image below to see how different values of e result in different quality approximations. The smaller the epsilon value, the more accurate the result. An infinitely small epsilon would give the exact right answer.

Forward Difference

The forward difference is just like the backwards difference but it evaluates forward instead of backwards.

The equation looks like this:

m = \frac{f(x+e)-f(x)}{e}

Below you can see it visually. Note again that smaller values of e make the estimation closer to correct.

On the GPU

If you’ve ever encountered the glsl functions dFdx and dFdy and wondered how they work, they actually use these same techniques.

Shaders run in groups, and using dFdx, the shader just looks to it’s neighbor for the value that was passed to it’s dFdx, then using “local differencing” (per the docs), gives each shader the derivative it was able to calculate.

Links

GLSL: dFdx, dFdy
Wikipediate: Finite Difference – The wikipedia page talks about more details, including how to calculate 2nd derivatives and higher!
Floating Point Denormals, Insignificant But Controversial
Comparing Methods of First Derivative Approximation Forward, Backward and Central Divided Difference