
Many people know that when you blur an image, you are applying a low pass filter that removes high frequencies.
From this, it’d be reasonable to expect that applying a high pass filter would sharpen an image, right?
Well, it turns out that is not the case! High pass filtering an image gives you everything that a low pass filter would remove from the picture, and it gives you ONLY that. Because of this, high pass filtering an image looks quite a bit different than you’d expect.

So when you sharpen an image in something like photoshop, what is it doing?
It does do a high pass filter and then adds those high-frequency details to the original image, thus boosting the high-frequency content. It’s doing an “Unsharp mask” https://en.wikipedia.org/wiki/Unsharp_masking. You may need to open the original image and the one below in separate browser tabs to flip back and forth and see the difference.
The algorithm for sharpening an image is then:
- Blur an image using whatever blur you wish (e.g., Box, Tent, Gaussian)
- Subtract the blurred result from the original image to get high-frequency details.
- Add the high-frequency details to the original image.
Algebraically, this can be expressed as:
image + (image – blurred)
or:
2 * image – blurred
Blurring is most commonly done by convolving an image with a low frequency kernel that sums to 1. If we are assuming that path to blurring, we can actually build a sharpening kernel which encodes the equation we just derived. For “image”, we’ll just use the identity matrix for convolution which is all zeros except a 1 in the center. That gives us this:
2 * identity – blur
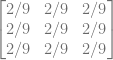
If we wanted to make a 3×3 box blur into a sharpening filter we would calculate it this way:

That makes this result:
You could also get a Gaussian blur kernel, like this one of Sigma 0.3 (calculated from http://demofox.org/gauss.html, it’s already normalized so adds up to 1.0) and calculate a sharpening filter from that:

That makes this result:

If you are wondering why a blur kernel has to add to 1, it technically doesn’t, but whatever it adds to is the brightness multiplier of the image it is being applied to. You can even use this to your advantage if you want to adjust the brightness while doing a blur. For instance, this kernel is a 3×3 box blur which also doubles the image brightness because it adds to 2.0.
When using the formulation of 2 * identity – blur to calculate our sharpening filter, if blur sums to 1, and of course identity sums to 1, our equation becomes 2 * 1 – 1 = 1, so our sharpening filter also sums to 1, which means it doesn’t make the image brighter or darker. You could of course multiply the sharpening filter by a constant to make it brighten or darken the image at the same time, just like with a blur.
You might have noticed that the blur kernels only had values between 0 and 1 which meant that if we used it to filter values between 0 and 1 that our results would also be between 0 and 1 (so long as the blur kernel summed to 1, and we weren’t adjusting brightness).
In contrast, our sharpening filters had values that were negative, AND had values that were greater than 1. This is a problem because now if we filter values between 0 and 1, our results could be less than 0, or greater than 1. We need to deal with that by clamping and/or remapping the range of output to valid values (tone mapping). In the examples shown here, I just clamped the results.
This problem can come up in low pass filters too (like Lanczos which is based on sinc), but doesn’t with box or gaussian.
You might be like me and think it’s weird that a low pass filter (blur kernel) sums to 1, while a high pass filter sums to 0. Some good intuition I got from this on twitter (thanks Bart!) is that the sum of the filter is the filter response for a constant signal. For a low pass filter, you’d pass the constant (0 hz aka DC) signal through, while for a high pass filter, you’d filter it out.
The 170 lines of C++ code that made the images in this post can be found at: https://github.com/Atrix256/ImageSharpening

Very interesting.
A more general approach is (1 + w) * image – w * blurred
The case shown here is when w is 1
LikeLike